Don't miss our holiday offer - up to 50% OFF!

How to Fray Denim: A Guide to Artful Destruction
Denim is more than just fabric; it’s a canvas for self-expression. While pristine, dark-wash jeans have their place, there’s an undeniable, cool-girl appeal to a perfectly frayed pair. Fraying denim introduces texture, character, and a touch of rebellious, lived-in history to your garments. Whether you’re aiming for a subtle, bohemian fringe or a grunge-inspired, deconstructed look, mastering the art of the fray allows you to customize your wardrobe sustainably and creatively.
This guide will walk you through the essential tools and techniques, from gentle weathering to aggressive destruction, and illustrate them with real-world examples of how this trend has been embraced.
The Toolkit for Textural Transformation
Before you begin, gather your supplies. You don’t need a professional workshop; most items are likely already in your home.
- The Denim: Start with 100% cotton denim for the best fraying results. Blends with polyester or spandex will not fray as dramatically.
- Precision Tools: Tweezers, a seam ripper, and small, sharp scissors (like embroidery snips) are your best friends for detailed work.
- Abrasive Elements: Sandpaper (medium to coarse grit), a cheese grater, a pumice stone, or even a metal nail file.
- The Foundation: A wood block, a cutting board, or a hardcover book to place inside the garment while you work.
- Safety & Finish: Protective gloves are recommended for aggressive methods, and a disposable razor can help create a worn-in look before fraying.

Method 1: The Classic Scissor & Fray
This is the most controlled method, ideal for creating precise holes and defined fringe on hems, pockets, and seams.
- Mark Your Spot: Use a washable fabric marker or a piece of chalk to outline where you want the fraying to occur.
- Secure the Fabric: Insert your wood block or book inside the leg or behind the area you’re working on. This provides a stable surface and prevents you from cutting through the back layer of the denim.
- Make the Initial Cut: Using sharp scissors, make a horizontal cut across the weft (horizontal) threads where you want the top of the fray to be.
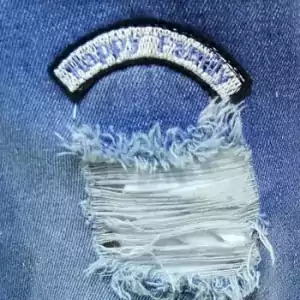
- Tweak and Pull: This is where the magic happens. Use your seam ripper or tweezers to gently pull out the vertical (warp) threads. These are the white threads you typically see in classic blue denim. Pull them out one by one until you’re left with a fringe of the blue horizontal threads. For a thicker fringe, leave more of the blue threads; for a wispier look, pull more out.
Real-World Case Study: The DIY Hemmed Kick-Flare Jeans
A fashion blogger wanted to update a pair of old, straight-leg jeans into a kick-flare style but found the new length unflattering. Instead of a traditional hem, she used this scissor-and-fray method. She cut the jeans to her desired length and then spent an evening meticulously pulling out the vertical threads with tweezers. The result was a personalized, bohemian-style fringe that added movement and a unique, artisanal touch to the silhouette, perfectly blending vintage flair with modern shape.
Method 2: The Abrasive Attack
This technique is less about creating holes and more about simulating years of authentic wear, thinning the fabric until it naturally begins to fray.
- Identify Wear Points: Think about where denim naturally wears down: the thighs, knees, around the pockets, and the hemline.
- Sand and Scrape: Place your block inside the garment. Vigorously rub your chosen abrasive tool—sandpaper, a cheese grater, or a pumice stone—over the targeted area. You are literally grinding away the surface fibers.
- Check Your Progress: Stop frequently to feel the fabric. You’re done when the denim has lost its indigo color and becomes thin, fuzzy, and pale. At this point, small holes and a soft fray will begin to appear. For a more intense look, you can use the tip of your scissors to make a small snip in the sanded area and then gently pull at the threads with your fingers to widen the fray organically.
Real-World Case Study: The Vintage-Inspired “Dad Jeans”
A thrift store enthusiast found a pair of stiff, light-wash “dad jeans” that were a little too pristine. To give them a genuine, decades-old feel, he used a multi-tool approach. He sanded the fronts of the thighs and the knees with coarse-grit sandpaper, focusing on creating a whiskered pattern around the crotch and pockets. He then used a pumice stone to wear down the hems and the edges of the back pockets. The final result was a pair of jeans that looked like they had been pulled from a time capsule from the 1980s, with a soft, thin texture and subtle, natural fraying in high-friction areas.
Method 3: The Razor Blade Technique
A single-edge razor blade or a craft knife offers unparalleled control for creating slits, controlled shredding, and precise patterns.
- Warning: This method requires extreme care. Always cut away from your body and use a protective surface underneath.
- Creating Slits: Lightly drag the blade horizontally across the denim, applying varying pressure. You don’t need to cut all the way through. These shallow cuts will weaken the fibers, and after a wash or two, they will open up into authentic-looking, frayed slashes.
- Shredding: For a heavily distressed look, make multiple parallel, shallow cuts close together. Once washed, this area will transform into a densely frayed, shredded section.
Real-World Case Study: The High-Fashion “Grunge Revival” Jacket
An aspiring designer purchased a classic denim jacket from a charity shop with the goal of creating a high-impact, runway-inspired piece. Using a razor blade, she carefully carved a series of long, vertical slashes on the back and sleeves. She then used the scissor-and-tweezer method to open some of the slashes and pull out threads, while leaving others as faint lines. The final step was throwing the jacket in the washing machine (inside a mesh bag to contain loose threads) on a warm cycle. The agitation accelerated the fraying process, resulting in a beautifully deconstructed jacket that echoed the iconic grunge looks of the 90s but with a modern, intentional design sensibility.
The Finishing Touch: Accelerating the Fray
No matter which method you use, you can enhance and soften the results with one simple step: the wash. Throw your newly customized denim into the washing machine (and dryer) on a warm setting. The agitation and tumbling will naturally pull loose threads, fluff up the frayed edges, and give your handiwork a more organic, less “made-yesterday” appearance. For an even more accelerated effect, some DIYers wash their denim with a few rough-textured items like sneakers or towels.
Fraying denim is a journey of creative destruction. It’s a process that transforms the mass-produced into the personal, telling a story with every pulled thread and worn-through patch. So, grab your oldest pair of jeans and your trusty tweezers—it’s time to start tearing things apart.